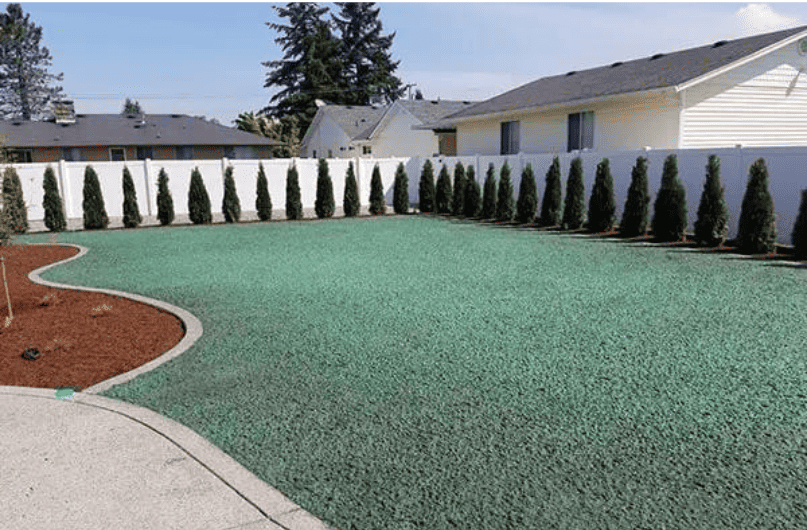
Hydroseeding, also known as hydraulic mulch seeding, is a planting process that uses a slurry of seed and mulch that is sprayed across an area to help establish vegetation cover. Hydroseeding is an easy, fast, and effective way to sow grass seed and create a lush lawn or restore vegetation.
Hydroseeding was originally developed in the 1950s as a way to quickly re-vegetate large areas and control soil erosion on construction sites, highways, and mining operations. It has since become a popular lawn care method used by homeowners and landscapers for establishing new lawns or overseeding existing turf.
The main benefits of hydroseeding include:
With its speed, effectiveness and ease of use, it's no wonder hydroseeding has become the preferred method for creating beautiful lush lawns in New Zealand.
Hydroseeding is a great option for establishing a new lawn or repairing patches in an existing lawn. The key advantages of hydroseeding make it ideal in the following situations:
Hydroseeding is a fast, efficient way to seed a new lawn. It allows you to distribute grass seed, fertilizer, and mulch over a large area in one application. Hydroseeding ensures even coverage and good seed-to-soil contact for maximum germination. This method saves significant time compared to seeding a new lawn manually. Hydroseeding establishes lawn grass quicker with less effort on bare soil or new construction sites.
Damaged or thin areas in an existing lawn can be filled in quickly with hydroseeding. It provides an easy way to re-seed bare or sparse patches without digging up and re-sodding sections. Hydroseeding also blends the patch with the surrounding lawn for a seamless appearance once the new grass grows in. This is faster and less labor-intensive than manual patching or sodding.
The grass seed, mulch, and tackifier in a hydroseeding mix help stabilize soils on slopes or banks. The mulch holds moisture and the tackifier binds everything together to prevent erosion and runoff until grass plants establish roots. Hydroseeding steep banks, construction sites, or roadsides provide an erosion control layer that also turns into an attractive green lawn. The grassroots secure the soil in place.
Hydroseeding is actually a simple process that can help you get a lush new lawn started. Here are the basic steps:
Proper site preparation is crucial for hydroseeding success. First, remove any existing vegetation from the area, along with rocks and debris. Use a rototiller or similar equipment to loosen the top 2-3 inches of soil, which allows the hydroseed mix to penetrate deeply. Grade and shape the area to allow for proper drainage.
Mix the hydroseed mulch, seed, fertilizer, and other amendments with water in a hydroseeding machine to create a nutrient-rich slurry. The mulch acts as a tackifier to help the slurry stick to the soil surface. Mix it according to the manufacturer's specifications.
Use the hydroseeding equipment to spray the slurry uniformly across the prepared area. Apply in multiple directions to ensure even coverage. The slurry layer should be 1/8 to 1/4 inches thick when dry. Don't hydroseed before rain, and protect newly hydroseeded areas from heavy rain to avoid washout.
Keep the area moist for 2-3 weeks after hydroseeding to ensure proper germination. Water lightly 2-3 times per day if there's no rain. Once sprouts emerge, water more deeply but less frequently. Mow once the grass is 3 inches tall, and fertilize 4-6 weeks after germinating.
Proper hydroseeding technique and aftercare results in a lush, even, weed-free lawn. It's an easy way to establish turf grass quickly.
The hydroseed mixture is key to getting a lush, green lawn from hydroseeding. The slurry sprayed onto your lawn contains four main ingredients:
Select a grass seed mix suitable for your climate and sunlight conditions. In New Zealand, a blend of ryegrass and fescue is commonly used. Make sure to use a mix formulated for lawns, with fine and dwarf cultivars. The seed mix should contain at least three grass species for resilience.
Fertilizer provides essential nutrients to help the grass seeds germinate and establish. Look for a starter fertilizer high in phosphorus to promote root growth. Slow release nitrogen is also important for sustained growth. The fertilizer concentration can range from 10-15 pounds per 1000 sq ft.
Wood fiber mulch in the hydroseed mix helps retain moisture and protects the grass seeds. It also anchors the seeds in place so they don't wash away. Use premium virgin wood mulch for the best results. The mulch is mixed as a loose cellulose fiber or more processed for better suspension.
A tackifier or soil binder is essential for the hydroseed mix to properly adhere to the soil surface. Natural guar gum tackifiers derived from plant sources are commonly used. They stick the slurry mix together and bond it to the soil. The tackifier concentration can range from 50-100 pounds per acre.
Choosing the right blend of these four ingredients is crucial for proper germination and establishment of a healthy, lush lawn from hydroseeding. Work with an experienced hydroseeding contractor to select the right mix for your property's specs.
Hydroseeding requires some specialized equipment to get the hydroseed mixture properly applied to the lawn area. Here are the key pieces of equipment you'll need:
The hydroseeder machine is the main piece of equipment. It's essentially a tank that can hold 500-1500 gallons of the hydroseed slurry mixture. The tank has an agitator that keeps the mixture blended and a pump to spray the slurry out through the hose and nozzle. Hydroseeders can be self-propelled or pulled behind a truck.
Some key features to look for in a hydroseeder include:
Professional landscapers often use trailer-mounted hydroseeders that can be pulled behind a truck. DIYers can rent smaller, more affordable hydroseeder models.
The hydroseeder will have a heavy-duty hose attached to the slurry tank to direct the spray. Look for hoses that are flexible but durable and resistant to kinks. Hose length can vary from 15-60 meters. Make sure to get a hose long enough to easily reach all parts of your lawn.
Nozzles are attached to the end of the hose to fan out the hydroseed spray evenly across the lawn. Look for nozzles made of brass, stainless steel or heavy-duty polymers. The nozzle's fan angle and flow rate can be adjusted for different spraying needs. Wider fan angles (40-50 degrees) are good for broad coverage.
Some nozzles have a hydraulic atomizing manifold that mixes the slurry with water for a more uniform spray. Interchangeable nozzles allow switching between spray patterns.
Having the right hydroseeding equipment will make the job much easier and help ensure an even application of slurry over the lawn area for optimal germination and growth. Investing in quality equipment is worth it for a lush, beautiful lawn.
Hydroseeding costs vary depending on factors like your lawn size, site conditions, and materials used. However, you can estimate costs by following these steps:
Calculate the area to be hydroseeded in square meters. Measure the length and width of the area and multiply to find the total square meters. Be sure to include any sloped areas and odd shapes. Most contractors charge by the square meter.
Estimate cost per square meter. In considering the cost per square meter for hydroseeding, take note of the varying factors that can affect this figure. Basic grass seed mixtures with mulch and tackifier may sit at the lower end of the cost range, while specialized mixtures using fertilizer could have a higher price per square meter.
Multiply area by cost per sqm for a total estimate. Multiply the calculated area by the estimated cost per square meter to arrive at a total cost estimate. This figure should encompass both materials and labor.
To finalize your budget, obtain quotes from at least 2-3 reputable hydroseeding contractors. These quotes should account for your lawn's specific details, including any necessary extra site prep work (such as grading or adding topsoil). With an accurate measurement of the area and an estimated cost per square meter, you can establish a reasonable budget for your hydroseeding project.
Hydroseeding, sod, and seeding are three popular lawn installation methods, each with their own pros and cons. Here's how they compare:
Generally considered an economical solution for establishing or overseeding a lawn, hydroseeding sits as a mid-range option in terms of cost. The pricing, though varying, makes it a popular choice for its balance between affordability and effectiveness.
Sod is typically the more expensive option for lawn installation. Professionally grown and cut into turf blocks, it offers an 'instant lawn' which justifies its higher expense. The costs can vary depending on the type of grass and the quality of the sod.
Seeding is the most cost-effective approach to establishing a new lawn. However, it demands a substantial amount of time and effort, both for installation and ongoing maintenance. The low initial cost comes with a trade-off in terms of manual labor and time for the lawn to fully establish.
In summary, hydroseeding offers a good middle-ground with affordable costs and relatively fast, uniform results compared to sod and seeding. It's an ideal solution for large areas or slopes that would be difficult to sod or seed.
After hydroseeding, proper lawn care and maintenance is crucial for nurturing the new grass and achieving a lush, healthy lawn. Here are some key maintenance tips:
Following these best practices for water, mowing, overseeding, and weeds will ensure your newly hydroseeded lawn thrives. Proper maintenance leads to a lush, green, and healthy lawn for years to come.
Hydroseeding is a great way to establish lush grass quickly, but it doesn't always go perfectly. Here are some common issues and how to address them:
It's normal to see some patchiness as the grass starts to grow. But if large areas are remaining bare after 4-6 weeks, it likely indicates an issue with germination. This could be due to:
It's normal to see some minor erosion after hydroseeding until the grass takes root. But heavy runoff indicates a problem. Try:
Some weeds are inevitable, but major weed patches indicate issues. Tackle weeds by:
With attentive care during establishment, hydroseeding can still deliver a lush, beautiful lawn even if a few issues pop up along the way. Don't hesitate to re-treat any problem spots. With a bit of patience and TLC, you'll achieve a flawless carpet of grass.
When it's time to hydroseed your lawn, finding the right contractor is key to getting the lush green lawn you desire. Here are some tips for finding and selecting a qualified hydroseeding contractor:
Make sure any contractor you consider is properly licensed for hydroseeding services in your state/region. They should carry liability insurance as well. Don't be afraid to ask to see their license and proof of insurance before hiring.
Find a contractor that specializes in hydroseeding and has several years of experience providing this service. They will understand how to create the optimal hydroseed mix and apply it correctly for your climate and yard conditions. Ask to see examples of their past hydroseeding work.
A reputable hydroseeding contractor should have a portfolio of completed hydroseeding projects you can look at. Seeing photos of their previous work will give you a good idea of their skill and the quality results they can deliver. Make sure their past projects are similar to your lawn size and scope.
Have the hydroseeding contractor provide a written estimate outlining exactly what services, materials, and costs will be included. Get quotes from at least 2-3 contractors and compare. Avoid contractors that are significantly lower priced than competitors.
Find online reviews of the contractor and ask for references you can contact. Speaking with past customers will provide insight into their service, professionalism, and the results they provided. Good contractors should have multiple positive reviews and be willing to connect you with satisfied customers.
Following these guidelines will definitely steer you in the right direction for your hydroseeding needs. Don't gamble with the health of your lawn; rather, entrust it to Real Landscaping, where we promise to convert your barren patch into a lush green lawn, preparing you for compliments from your neighbors. Ready to make your dream lawn a reality? Contact us today and begin your journey towards the perfect lawn.
The best time for hydroseeding is during the warmer months from spring through autumn. Avoid hydroseeding in winter when grass seeds will struggle to germinate and establish due to cold temperatures and less sunlight. Spring and autumn are ideal times, as the cooler temperatures and rain help seeds germinate.
It usually takes 7-21 days for the first signs of germination to appear after hydroseeding. Full grass establishment takes 6-8 weeks. Proper watering and fertilization during this time is crucial. Avoid mowing new hydroseeded lawns for at least 4 weeks after sprouting.
Hydroseeding does require vigilant watering 1-2 times daily to keep seeds moist for 2-3 weeks after application. After sprouts appear, water deeply 2-3 times a week. Fertilize with a starter fertiliser 2-4 weeks after sprouting and mow once the grass is 4+ inches tall.
With proper maintenance and care, a hydroseeded lawn can last for many years. Hydroseeding uses the same types of grass seeds that are used when sowing lawns by traditional methods. Reseeding or overseeding may be needed periodically to fill in bare spots.
Hydroseeding typically costs $1,000-$1,500 for a standard residential lawn of 2,000-3,000 sq ft. Hydroseeding is generally more expensive than traditional seeding but requires less intensive labour. Get quotes from several hydroseeding professionals.
Frequent watering, fertilizing, mowing, overseeding as needed, and addressing drainage issues will help maintain a hydroseeded lawn. Aerate compacted areas. Overseed bare or thin spots. Mow to the proper height for the grass species. Remove debris and reapply hydroseed to areas of erosion.
Wait at least 4 weeks after the grass sprouts to mow a new hydroseeded lawn. Let the grass grow to around 4 inches before the first mowing. After that, maintain proper mowing height for the type of grass. Never cut off more than 1/3 of the grass blade height when mowing.
Yes, hydroseeding is an effective way to overseed and thicken up an existing lawn, bare patches, or areas damaged by pet urine spots. Mow the existing lawn short, rake to remove dead material, then hydroseed.
Avoid improper watering, poor timing, using low quality hydroseed mix, inadequate site prep, lack of fertilizer, and mowing too soon. Also, don't hydroseed on windy days when the slurry can blow away before seeds adhere. Carefully follow all preparation and aftercare steps.